Integrating Rust in a React Native Project: Step-by-Step Guide
Posted in rust-lang, native-modules on February 16, 2023 by Hemanta Sapkota ‐ 11 min read

React Native is a popular framework for building mobile applications. It allows developers to write code in JavaScript and deploy it to both iOS and Android platforms. Rust, on the other hand, is a systems programming language that is fast, safe, and reliable. While Rust is not typically used for building mobile applications, it can be integrated with React Native to allow developers to write high-performance native modules.
Motivations
There are several reasons why a developer might want to integrate Rust with React Native:
- Performance: Rust is a compiled language that is optimized for performance. By integrating Rust modules into a React Native application, developers can improve the performance of their application.
- Safety: Rust is designed to prevent common programming errors such as null pointer dereferences and buffer overflows. By using Rust modules in a React Native application, developers can reduce the risk of crashes and security vulnerabilities.
- Compatibility: Rust can be compiled to run on a variety of platforms, including iOS and Android. This makes it an ideal choice for building native modules that can be used across different mobile platforms.
Step 1: Install Rust
To get started, you’ll need to install Rust on your development machine. You can download Rust from the official website (https://www.rust-lang.org/tools/install).
Step 2: Create a New Rust Project
Next, you’ll need to create a new Rust project. You can do this using the cargo new command. Navigate to the React Native project root directory and run:
cargo new --lib my_rust_module
This creates a new Rust project named my_rust_module.
Step 3: Write Your Rust Code
You can now start writing your Rust code. For simplicity, we’ll create a function to add two numbers:
#[no_mangle]
pub extern "C" fn add_numbers(a: i32, b: i32) -> i32 {
    a + b
}
Step 4: Integrate Your Rust Project for iOS Using XCFramework
The xcframework is a bundle format introduced by Apple that allows developers to package multiple versions of a library or framework into a single bundle that can be imported and used in Xcode projects. This format is particularly useful when dealing with different architectures (like arm64 for physical devices and the simulator on M2 Macs) as it simplifies the process of using the correct binary for the build target.
Step 4.1: Configure Cargo for Static Libraries
Update Cargo.toml:
[package]
name = "my_rust_module"
version = "0.1.0"
edition = "2021"

[lib]
name = "my_rust_module"
crate-type = ["staticlib"]
Step 4.2: Compile Rust Code for iOS
Before compiling the Rust code for iOS devices and simulators, ensure you have the required targets installed. If not, you can add them using rustup:
rustup target add aarch64-apple-ios
rustup target add aarch64-apple-ios-sim
Now, compile the Rust code for both iOS devices and simulators:
cargo build --release --target aarch64-apple-ios
cargo build --release --target aarch64-apple-ios-sim
Step 4.3: Generate Header File
When you compile a Rust module as a static library for iOS, the resulting binary file contains compiled machine code that can be executed by the device’s CPU. However, to call functions from the Rust module in other parts of your codebase (like a React Native app), you need to provide information about the function signatures and data types that the Rust module uses.
This is where header files come into play. A header file is a text file containing declarations of functions, variables, and data types used in the Rust module. When this header file is included in your React Native app’s code, the compiler uses its information to ensure your code is interfacing with the Rust functions correctly.
To generate header files for your Rust module, you can employ the cbindgen tool. cbindgen processes the Rust code and generates a header file with C-style declarations for all functions, variables, and data types present in the code. This header file can then be included in your React Native app’s code to invoke the Rust functions.
cbindgen --lang c --crate my_rust_module --output my_rust_module.h
The resulting header files look like the following:
#include <stdarg.h>
#include <stdbool.h>
#include <stdint.h>
#include <stdlib.h>

int32_t add_numbers(int32_t a, int32_t b);
Step 4.4: Generate an XCFramework
Use the xcodebuild tool to create the xcframework:
# Use the xcodebuild tool to create an xcframework
xcodebuild -create-xcframework \
# Specify the library compiled for iOS devices (ARM64 architecture)
-library target/aarch64-apple-ios/release/libmy_rust_module.a \
# Provide the path to the header files for the above library
-headers ./headers \
# Specify the library compiled for the iOS simulator (ARM64 architecture on M1 Macs)
-library target/aarch64-apple-ios-sim/release/libmy_rust_module.a \
# Provide the path to the header files for the simulator library
-headers ./headers \
# Define the output name and format for the combined xcframework
-output my_rust_module.xcframework
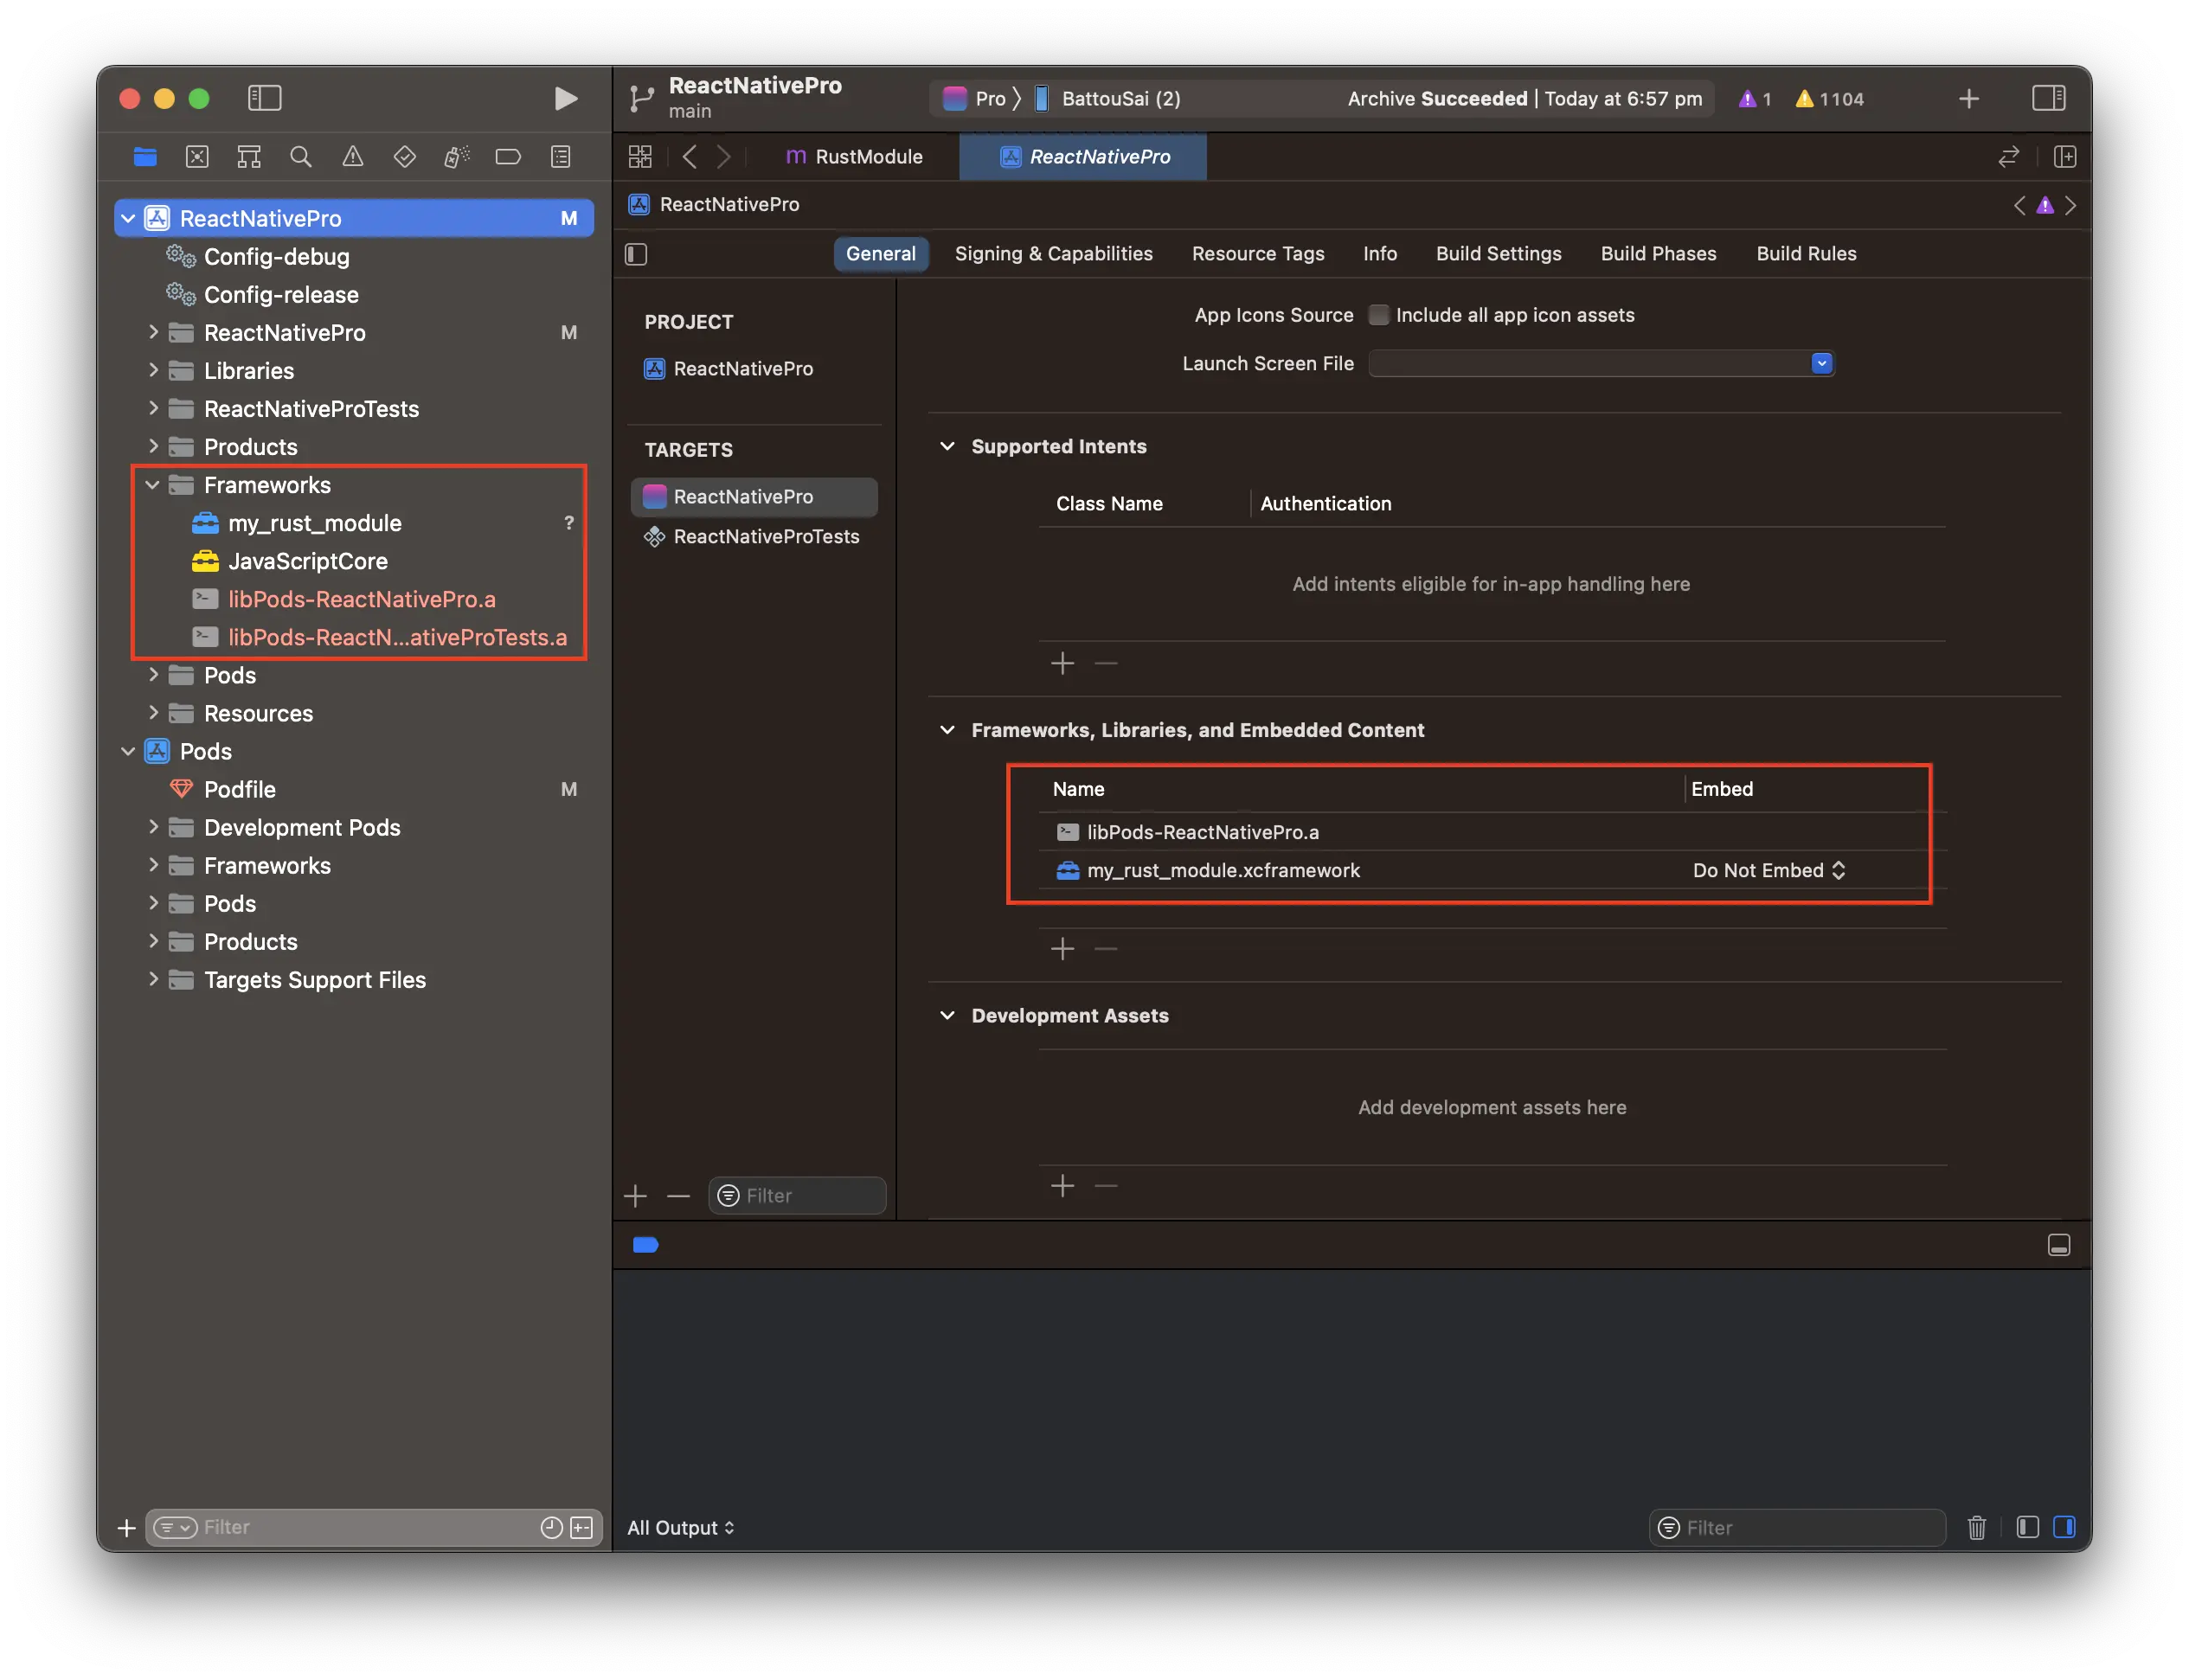
Step 4.5: Link the XCFramework in Xcode
Drag and drop the my_rust_module.xcframework into your Xcode project. Make sure it’s added under Frameworks, Libraries, and Embedded Content.
Step 4.6: Bridge Rust Functions to React Native
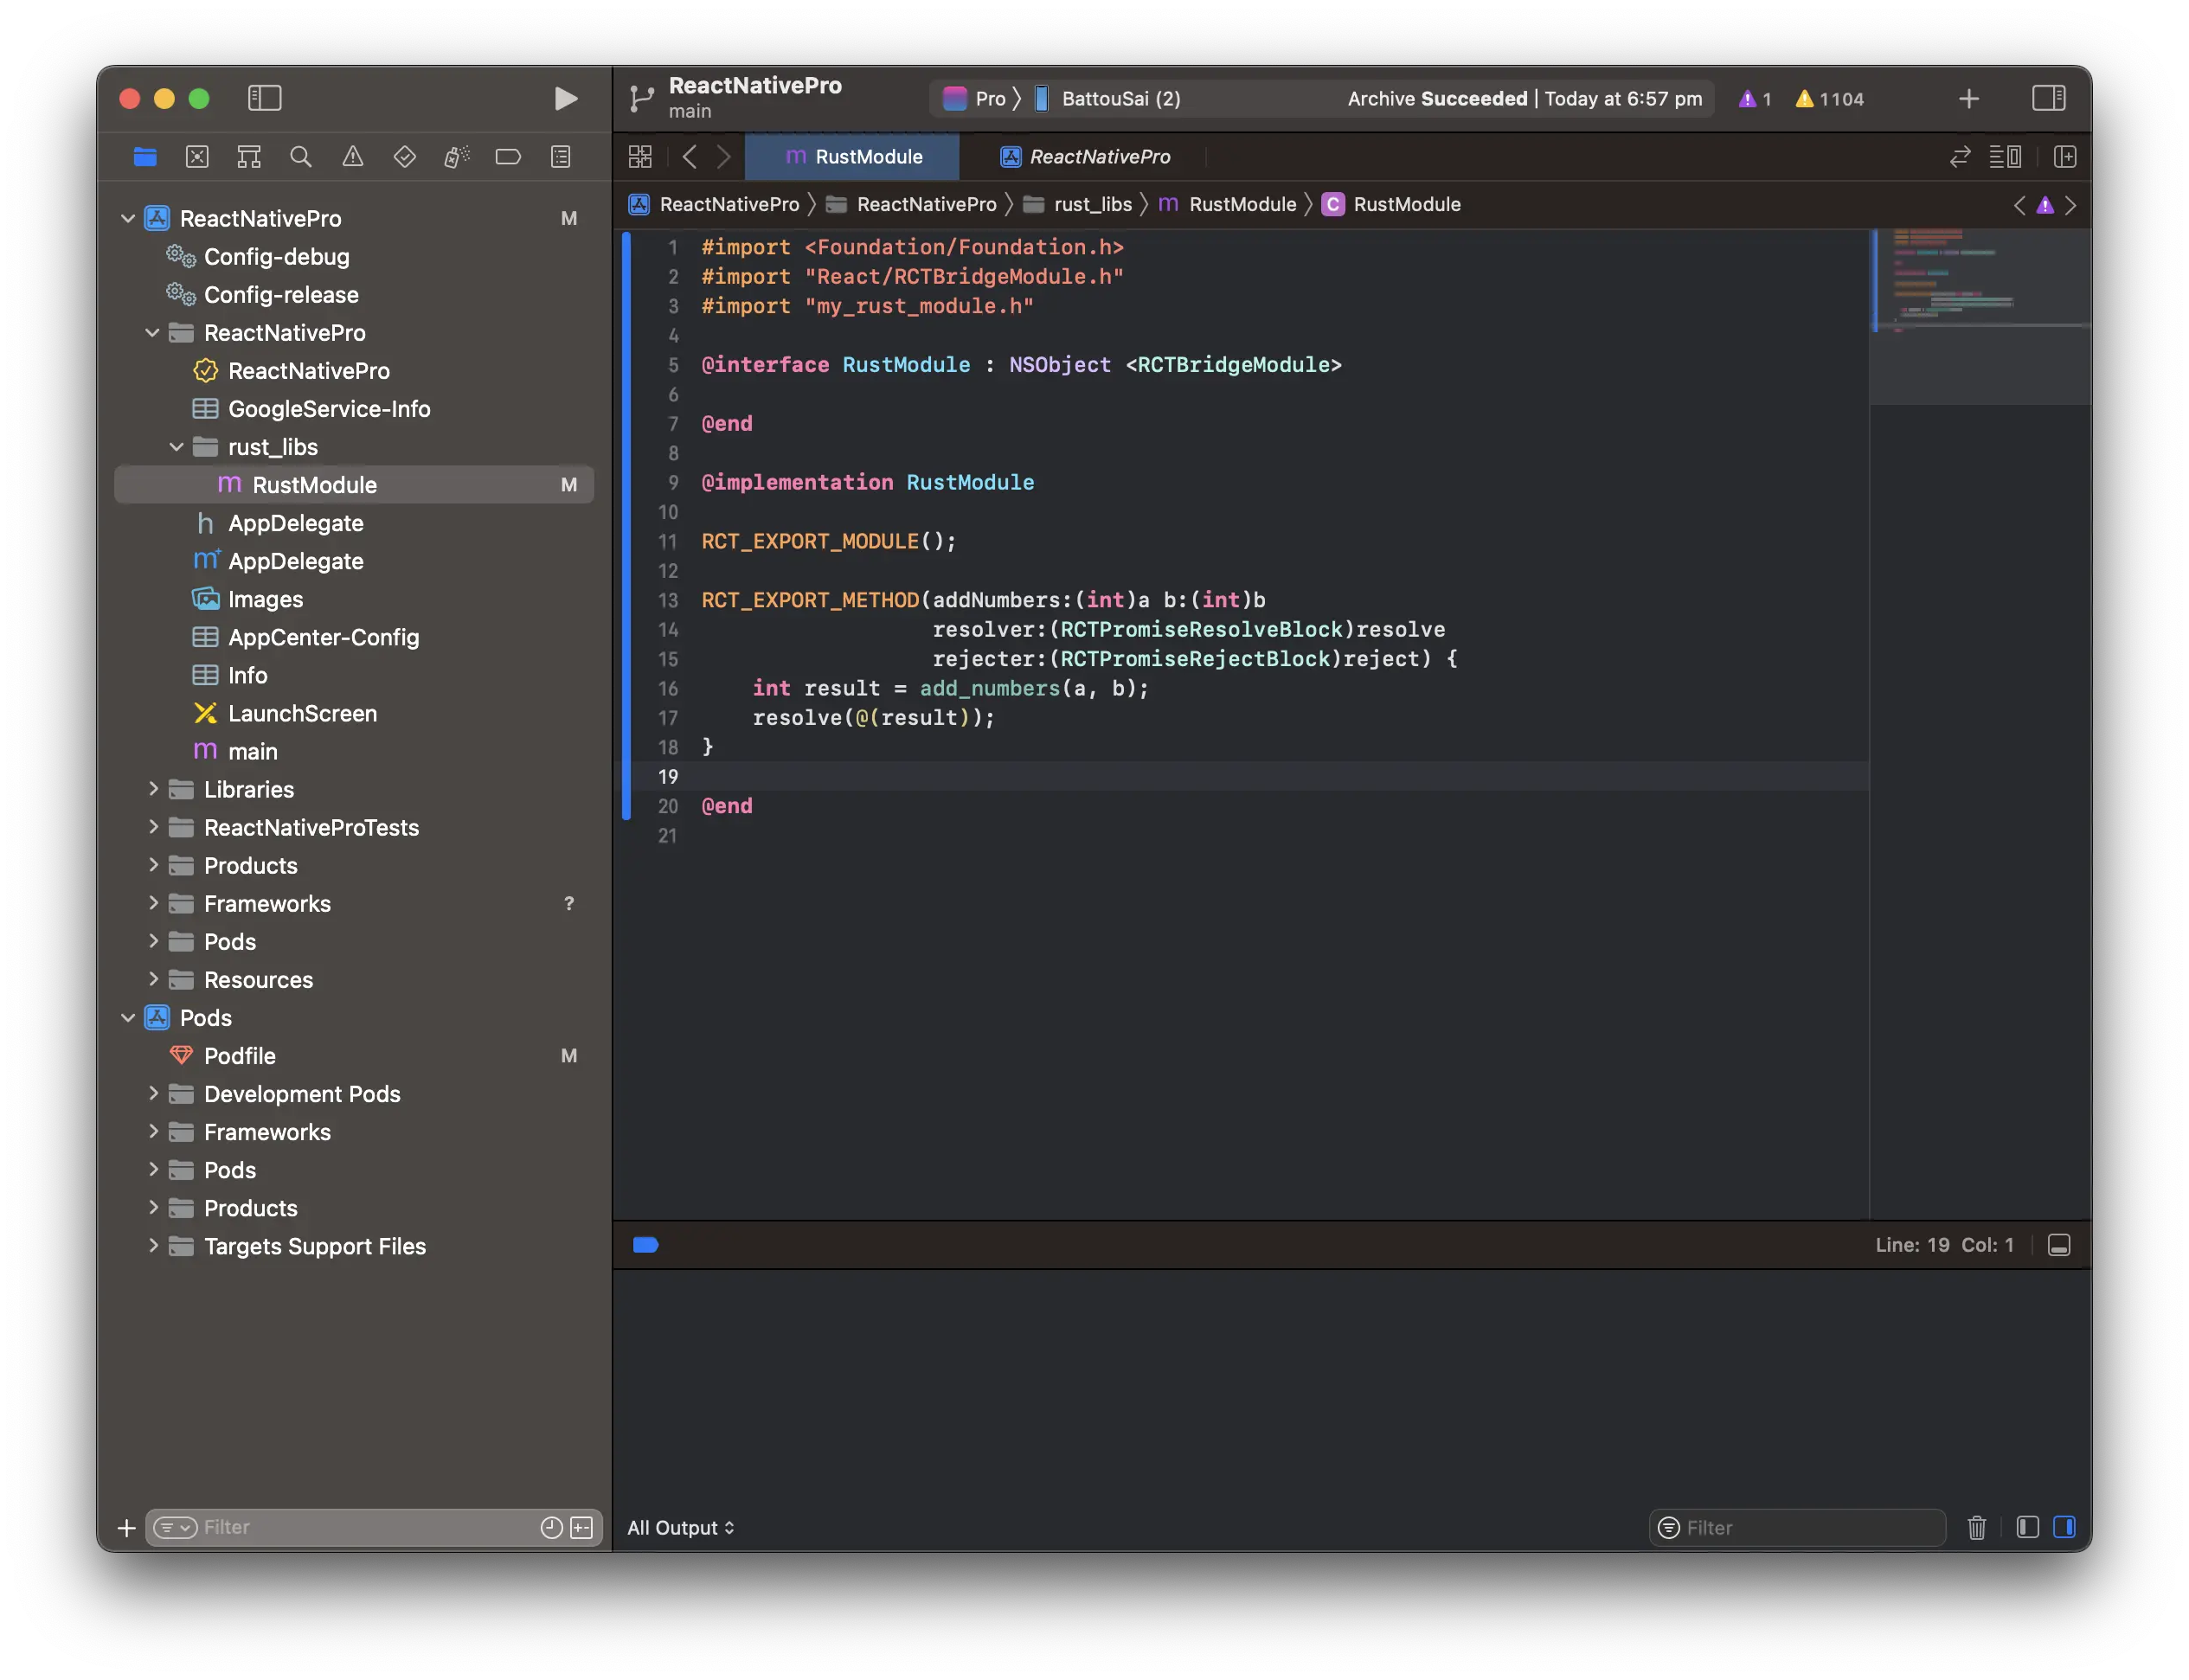
You can now bridge the Rust functions to React Native. Here’s an example in Objective-C:
#import <React/RCTBridgeModule.h>
#include "my_rust_module.h"

@interface MyRustModule : NSObject <RCTBridgeModule>
@end

@implementation MyRustModule

RCT_EXPORT_MODULE();

RCT_EXPORT_METHOD(addNumbers:(int)a b:(int)b
                  resolver:(RCTPromiseResolveBlock)resolve
                  rejecter:(RCTPromiseRejectBlock)reject) {
    int result = add_numbers(a, b);
    resolve(@(result));
}

@end
Step 5: Integrate Your Rust Project for Android
Step 5.1: Set Up Cargo for Android Targets
Before compiling Rust for Android, you’ll need to add support for Android targets. Use rustup to add the required targets:
rustup target add aarch64-linux-android armv7-linux-androideabi i686-linux-android x86_64-linux-android
These targets cover most modern Android devices.
Step 5.2: Download Android NDK
To compile Rust code for Android, you’ll need the Android NDK (Native Development Kit). If you haven’t already, download the Android NDK.
Step 5.3: Opting for the jni crate over Manual JNI
The Java Native Interface (JNI) is a programming framework that allows Java code to interoperate with applications and libraries written in other languages, such as C, C++, and Rust.
Manually handling the JNI interface is a challenging endeavor, often required when there’s a need for precise control or to cater to specific JNI scenarios that general tools might not address. It can be verbose, error-prone, and demands an in-depth grasp of JNI intricacies, especially when it comes to data type conversions between Rust and Java.
For a more streamlined approach, the jni crate in Rust offers a valuable alternative. It abstracts the complexities of the JNI, providing a Rust-centric API that enhances the development experience. Through this crate, you can bypass the manual process, as it auto-generates the necessary JNI boilerplate, ensuring a smoother and more efficient integration between Rust and Java.
Step 5.4: Setting up jni crate in Cargo and Downloading Dependencies
- Add the jni crate to your Cargo.toml: Open your Cargo.toml file and under the [dependencies] section, add the jni crate.
[dependencies]
jni = "0.19" # Check for the latest version on crates.io
- Fetch and Compile Dependencies: Run the following command to fetch and compile the newly added dependency:
cargo fetch
Step 5.5: Writing the JNI Wrapper Function
To expose our add_numbers function to Java through JNI, we need to create a wrapper function. The function signature will follow JNI naming conventions and include data type conversions where necessary.
use jni::JNIEnv;
use jni::objects::{JClass, JString};
use jni::sys::jint;

#[no_mangle]
pub unsafe extern "C" fn Java_com_reactnativepro_MyRustModule_nativeAddNumbers(
    env: JNIEnv,
    class: JClass,
    a: jint,
    b: jint
) -> jint {
    add_numbers(a, b)
}
5.6: Compile Rust Code for Android using ‘cargo-ndk’
When building Rust code for Android, handling multiple architectures and setting up the NDK can be complex. Fortunately, cargo-ndk simplifies this process by integrating the NDK into the cargo workflow.
- Ensure you have the Android NDK installed.
- Install
cargo-ndkvia cargo:cargo install cargo-ndk
With cargo-ndk, you can easily compile your Rust module for various Android architectures. Run the following commands:
cargo ndk --target aarch64-linux-android --platform 21 -- build --release
cargo ndk --target armv7-linux-androideabi --platform 21 -- build --release
cargo ndk --target i686-linux-android --platform 21 -- build --release
cargo ndk --target x86_64-linux-android --platform 21 -- build --release
- –target specifies the architecture.
- –platform 21 indicates the Android API level. You can adjust this depending on the minimum API level you want to support.
- – build –release is the cargo command instructing it to build in release mode.
These commands will produce .so files for each architecture in the target/<architecture_name>/release directory.
Step 5.7: Integrate the Compiled Library into Your React Native Android App
Copy the .so files: Create a directory in your React Native project’s Android app module: android/app/src/main/jniLibs/. Under jniLibs, create directories for each architecture (armeabi-v7a, arm64-v8a, x86, x86_64). Copy each .so file to its respective architecture directory.
Step 5.8: Automate the Build and Copy Process
While the steps for building with cargo-ndk and copying the .so files to the appropriate jniLibs directories are straightforward, doing this repeatedly during development can be tedious. We can automate this process using a simple bash script.
#!/bin/bash

# Directories
RUST_MODULE_DIR="./path_to_your_rust_module" # Replace with the path to your Rust module
REACT_NATIVE_ANDROID_DIR="./android/app/src/main" # Replace with the path to your React Native Android main directory if different

# Build using cargo-ndk
cargo ndk --target aarch64-linux-android --platform 21 -- build --release
cargo ndk --target armv7-linux-androideabi --platform 21 -- build --release
cargo ndk --target i686-linux-android --platform 21 -- build --release
cargo ndk --target x86_64-linux-android --platform 21 -- build --release

# Copy the .so files to jniLibs folder
mkdir -p "$REACT_NATIVE_ANDROID_DIR/jniLibs/arm64-v8a"
mkdir -p "$REACT_NATIVE_ANDROID_DIR/jniLibs/armeabi-v7a"
mkdir -p "$REACT_NATIVE_ANDROID_DIR/jniLibs/x86"
mkdir -p "$REACT_NATIVE_ANDROID_DIR/jniLibs/x86_64"

cp "$RUST_MODULE_DIR/target/aarch64-linux-android/release/libmy_rust_module.so" "$REACT_NATIVE_ANDROID_DIR/jniLibs/arm64-v8a/"
cp "$RUST_MODULE_DIR/target/armv7-linux-androideabi/release/libmy_rust_module.so" "$REACT_NATIVE_ANDROID_DIR/jniLibs/armeabi-v7a/"
cp "$RUST_MODULE_DIR/target/i686-linux-android/release/libmy_rust_module.so" "$REACT_NATIVE_ANDROID_DIR/jniLibs/x86/"
cp "$RUST_MODULE_DIR/target/x86_64-linux-android/release/libmy_rust_module.so" "$REACT_NATIVE_ANDROID_DIR/jniLibs/x86_64/"

echo "Build completed and .so files copied successfully!"
Now in your terminal, navigate to the location of the script and make it executable: chmod +x build_and_copy.sh
Whenever you need to build the Rust code and copy the .so files, simply run: ./build_and_copy.sh
Step 5.9: Set up the Bridging Module in Android
After successfully building our Rust library and generating the necessary .so files, we need to bridge that Rust functionality into our React Native application. This is where the Android Native Modules come into play. In this section, we’ll create a bridging module that allows our JavaScript code to interact seamlessly with our native Rust code.
1. Create the Rust Bridge Java Class
First, navigate to the java/com/yourprojectname/ directory in your Android project. Create a new Java class named RustBridgeModule.java (or any other descriptive name you prefer).
Here’s a skeleton of what the RustBridgeModule.java file should look like:
package com.yourprojectname;

import android.os.Handler;
import androidx.annotation.NonNull;

import com.facebook.react.bridge.ReactApplicationContext;
import com.facebook.react.bridge.ReactContextBaseJavaModule;
import com.facebook.react.bridge.ReactMethod;
import com.facebook.react.bridge.Promise;

public class RustBridgeModule extends ReactContextBaseJavaModule {

    private static ReactApplicationContext reactContext;

    private static native int nativeAddNumbers(int a, int b);

    // Load the Rust library
    static {
        System.loadLibrary("my_rust_module");
    }

    RustBridgeModule(ReactApplicationContext context) {
        super(context);
        reactContext = context;
    }

    @NonNull
    @Override
    public String getName() {
        return "RustModule";
    }

    @ReactMethod
    public void addNumbers(int a, int b, final Promise promise) {
        int result = RustModule.nativeAddNumbers(a, b);
        promise.resolve(result);
    }
}
The three sections in the code are as follows:
Loading the Rust Module:
This process involves incorporating the compiled Rust library into the app, making the functions within the Rust code accessible to the Java environment. It’s a crucial step for enabling cross-language interactions.
Native nativeAddNumbers Method:
This native method acts as a direct conduit to the Rust function, facilitating calls to Rust’s efficient computations while operating within the Java ecosystem. It serves as a foundational bridge between Java and Rust.
React addNumbers Method:
Serving as the interface between JavaScript (React Native layer) and Java, this method simplifies invoking Rust functionalities from the app’s frontend. It streamlines cross-language communication, ensuring a responsive and cohesive user experience.
2. Create the Bridge module package
package com.reactnativepro;

import androidx.annotation.NonNull;

import com.facebook.react.ReactPackage;
import com.facebook.react.bridge.NativeModule;
import com.facebook.react.bridge.ReactApplicationContext;
import com.facebook.react.uimanager.ViewManager;

import java.util.ArrayList;
import java.util.Collections;
import java.util.List;

public class RustModulePackage implements ReactPackage {
    @NonNull
    @Override
    public List<NativeModule> createNativeModules(@NonNull ReactApplicationContext reactContext) {
        List<NativeModule> modules = new ArrayList<>();
        modules.add(new RustModule(reactContext));
        return modules;
    }

    @NonNull
    @Override
    public List<ViewManager> createViewManagers(@NonNull ReactApplicationContext reactContext) {
        return Collections.emptyList();
    }
}
The RustModulePackage acts as a container for one or more native modules (like RustModule), allowing them to be bundled together and used in the React Native application. It’s an essential part of the bridge between JavaScript and native code in React Native.
3. Integrate RustModulePackage in MainApplication.java
package com.reactnativepro;

import android.app.Application;
import com.facebook.react.PackageList;
import com.facebook.react.ReactApplication;
import com.facebook.react.ReactNativeHost;
import com.facebook.react.ReactPackage;
import com.facebook.react.defaults.DefaultNewArchitectureEntryPoint;
import com.facebook.react.defaults.DefaultReactNativeHost;
import com.facebook.soloader.SoLoader;
import java.util.List;
import com.microsoft.codepush.react.CodePush;

public class MainApplication extends Application implements ReactApplication {

  private final ReactNativeHost mReactNativeHost =
      new DefaultReactNativeHost(this) {
        @Override
        public boolean getUseDeveloperSupport() {
          return BuildConfig.DEBUG;
        }

        @Override
        protected List<ReactPackage> getPackages() {
          @SuppressWarnings("UnnecessaryLocalVariable")
          List<ReactPackage> packages = new PackageList(this).getPackages();
          // Packages that cannot be autolinked yet can be added manually here, for example:
           packages.add(new RustModulePackage());
          return packages;
        }

        @Override
        protected String getJSMainModuleName() {
          return "index";
        }

        @Override
        protected String getJSBundleFile() {
          return CodePush.getJSBundleFile();
        }

        @Override
        protected boolean isNewArchEnabled() {
          return BuildConfig.IS_NEW_ARCHITECTURE_ENABLED;
        }

        @Override
        protected Boolean isHermesEnabled() {
          return BuildConfig.IS_HERMES_ENABLED;
        }
      };

  @Override
  public ReactNativeHost getReactNativeHost() {
    return mReactNativeHost;
  }

  @Override
  public void onCreate() {
    super.onCreate();
    SoLoader.init(this, /* native exopackage */ false);
    if (BuildConfig.IS_NEW_ARCHITECTURE_ENABLED) {
      // If you opted-in for the New Architecture, we load the native entry point for this app.
      DefaultNewArchitectureEntryPoint.load();
    }
    ReactNativeFlipper.initializeFlipper(this, getReactNativeHost().getReactInstanceManager());
  }
}
The MainApplication class serves as a configuration hub for your React Native application on Android. It’s where you integrate various services, modules, and packages, including those for your Rust components. The seamless operation of your application depends on the correct configuration of this class.
Step 6: Create a React Native Module
To use the Rust code in React Native, create a module:
import {NativeModules} from 'react-native';
const {MyRustModule} = NativeModules;
export default MyRustModule;
Step 7: Use Your Rust Module in React Native
To use the module in React Native:
import MyRustModule from './my_rust_module/MyRustModule';
console.log(MyRustModule.addNumbers(1, 2));
Conclusion
Integrating Rust in a React Native project can be a powerful way to improve the performance and safety of your mobile application. By following these steps, you can easily create high-performance native modules using Rust and React Native.
comments powered by Disqus