Mastering RTK Query: A Comprehensive Guide for Efficient Server-Side Data Management in React Native Apps
Posted in redux, redux-toolkit, rtk-query, frontend-state-management on March 30, 2024 by Hemanta Sapkota ‐ 9 min read
For developers seeking effective ways to handle server-side data in Redux applications, it's essential to get a good handle on Redux Toolkit's RTK Query. The RTK Query makes the processes of data fetching, caching, and state management simpler, leading to better performing applications. This guide aims to cover the fundamentals of RTK Query, while also providing insights into more complex features, such as optimistic updates and pagination, using real-world examples.
Introduction to RTK Query
RTK Query, a key component of Redux Toolkit, makes dealing with server-side data in Redux applications much more straightforward. It takes care of the nitty-gritty details of data management, freeing developers to concentrate on crafting their application’s functionality. RTK Query equips developers with a suite of utilities and functions that streamline data fetching and state updates, all while cutting down on boilerplate code.
Key Features of RTK Query
- Automatic Caching: RTK Query stores fetched data directly in memory, which cuts down on unnecessary network requests and boosts application performance.
- Polling: It includes a feature for automatic polling, which keeps the data up-to-date by repeatedly fetching it at set time frames.
- Data Fetching and Updating: RTK Query simplifies how we fetch data and seamlessly supports changes for updating or inserting data.
- Tag-based Invalidation: Uses a system based on tags for cache invalidation to make sure the cache updates effectively when corresponding data changes.
Setting up a Redux store
To kickstart your journey with RTK Query, the initial step is setting up a Redux store - the core of every Redux application that contains your app’s complete state. If Redux Toolkit isn’t part of your project yet, make it so with this simple npm command:
npm install @reduxjs/toolkit
The next task involves creating your Redux store. Redux Toolkit comes with a handy function known as configureStore. This function streamlines the process of creating your store and automatically includes a number of middleware enhancements, one of which being Redux Thunk. Let’s take a look at a basic setup:
import { configureStore } from '@reduxjs/toolkit';

const store = configureStore({
  reducer: {
    // your reducers go here
  },
});
When using the configureStore function, you’ll input an object with a reducer field. This reducer field is an object itself, and should contain the various reducing functions your application requires.
Once this step is complete, your Redux store is primed and ready for use. The next course of action is to integrate this store into your application. You can achieve this by employing the Redux Provider component.
import { Provider } from 'react-redux';

<Provider store={store}>
  {/* your app goes here */}
</Provider>
With these configurations in place, your application is primed to utilize Redux and RTK Query. Keep in mind, it’s important to position the store at the topmost level of your app. Doing so ensures that all components, if necessary, have the ability to access the Redux state.
What is a Slice?
In Redux, the global state is broken down into several “slices”. Each “slice” represents a particular application domain or a group of related states. This breakdown makes managing the Redux state simpler because state changes are managed per slice instead of the entire state.
To create an API slice with RTK Query, you utilize the createApi method. This requires you to set up your API’s base URL and endpoints.
Example: Creating a User API Slice
This example demonstrates how to create an API slice with RTK Query.
typescriptCopy code// src/services/userApi.ts
import { createApi, fetchBaseQuery } from '@reduxjs/toolkit/query/react';

export const userApi = createApi({
  reducerPath: 'userApi',
  baseQuery: fetchBaseQuery({ baseUrl: '/api/' }),
  endpoints: (builder) => ({
    getUserMeta: builder.query({
      query: (userId) => `users/${userId}`,
    }),
    updateUser: builder.mutation({
      query: (user) => ({
        url: `users/${user.id}`,
        method: 'PUT',
        body: user,
      }),
    }),
  }),
});
In this setup, we define two endpoints: getUserMeta for fetching user metadata and updateUser for updating user information. RTK Query automatically generates hooks for these endpoints, which you can use in your components.
Add reducer to the Redux store configuration
It’s vital to add the userApi reducer to the store configuration. By doing this, the Redux store can handle state changes linked to the userApi slice. This lets the reducer of the userApi slice manage dispatched actions and update the state as needed. Therefore, whenever data related to the user API changes, like when fetching user data or updating user info, these changes are mirrored in the Redux store. This keeps the state in the Redux store consistent and updated, which is crucial for the smooth operation and performance of the app.
To integrate a slice into your Redux store, you’ll need to take the following steps:
- Import the API slice you’ve created. In this case, it’s
userApi. - Next, you have to incorporate the slice into your store configuration. This involves adding a new field in the
reducerobject, within theconfigureStorefunction. The field key should match thereducerPathyou’ve specified when creating the API slice. The value should be thereducerthat has been exported from the API slice. To illustrate, it would look something like this:[userApi.reducerPath]: userApi.reducer. - Finally, you have to attach the API slice’s middleware to the store. This is accomplished by invoking the
getDefaultMiddlewarefunction, which yields an array of the default middleware present in the store. From there, you concatenate it with the API slice’s middleware:getDefaultMiddleware().concat(userApi.middleware).
export const store = configureStore({
  reducer: {
    [userApi.reducerPath]: userApi.reducer,
  },
  middleware: (getDefaultMiddleware) =>
    getDefaultMiddleware().concat(userApi.middleware),
});
Consuming API Endpoints
RTK Query generates React hooks for interacting with API endpoints in components.
Using Generated Hooks in Components
import React from 'react';
import { useGetUserMetaQuery, useUpdateUserMutation } from 'src/services/userApi';

const UserProfile = ({ userId }) => {
  const { data, isLoading, error } = useGetUserMetaQuery(userId);
  const [updateUser, { isLoading: isUpdating }] = useUpdateUserMutation();

  if (isLoading) return <div>Loading...</div>;
  if (error) return <div>Error: {error.message}</div>;

  return (
    <div>
      <h1>{data?.name}</h1>
      <button onClick={() => updateUser({ id: userId, name: 'New Name' })}>
        Update Name
      </button>
    </div>
  );
};
This example demonstrates fetching user data with useGetUserMetaQuery and updating it with useUpdateUserMutation. RTK Query handles the asynchronous logic, loading states, and error handling, making it easier to manage stateful UI components.
Advanced Features and Best Practices
RTK Query provides a range of enhanced features that can significantly improve application responsiveness and efficiency.
- Optimistic Updates. This feature allows the UI to reflect changes immediately as if the mutations are successful, and only reverts if an error occurs. Secondly, RTK Query enables
- Pagination, which is a technique for handling large datasets. This method fetches and displays data in small pieces, thereby improving loading speed and reducing the initial data size.
Optimistic Updates
Optimistic updates are a strategy where the UI is immediately updated as if a requested operation (like a mutation) was successful, without waiting for the server response. This approach improves the perceived responsiveness of the application by providing instant feedback to the user. If the operation fails, the changes are then rolled back.
Implementing Optimistic Updates
RTK Query supports optimistic updates through the use of the onQueryStarted lifecycle event within mutations. Here’s how you can implement an optimistic update when updating a user’s name:
import { userApi } from './[your-api-slice]';

export const optimisticUpdateUser = userApi.useUpdateUserMutation({
  onQueryStarted: async (updatedUser, { dispatch, queryFulfilled }) => {
    // Optimistically update the UI before the mutation is completed
    const patchResult = dispatch(
      userApi.util.updateQueryData('getUserMeta', updatedUser.id, (draft) => {
        // Assume the update will succeed, and modify the local cache as needed
        draft.name = updatedUser.name;
      })
    );

    try {
      // Wait for the mutation to resolve
      await queryFulfilled;
    } catch {
      // If the mutation fails, undo the optimistic update
      patchResult.undo();
    }
  },
});
This code demonstrates how to optimistically update a user’s name in the UI, with provisions to roll back the changes if the update operation fails. The key steps are: 1) Optimistically update the local cache before the mutation is completed, 2) Wait for the mutation to resolve, and 3) If the mutation fails, undo the optimistic update.
Pagination
Pagination is the process of dividing data into discrete pages, which is essential for managing large datasets efficiently. RTK Query provides tools to implement pagination strategies that can significantly improve performance by loading data in chunks.
Implementing Pagination
To set up pagination using RTK Query, craft endpoints that take in pagination parameters, such as the page number and page size. Here’s a simple way to create a paginated endpoint to retrieve posts:
export const apiSlice = createApi({
  reducerPath: 'api',
  baseQuery: fetchBaseQuery({ baseUrl: '/api' }),
  endpoints: (builder) => ({
    getPosts: builder.query({
      query: ({ page, limit }) => `posts?page=${page}&limit=${limit}`,
      // Transform the response to include page information
      transformResponse: (response, meta, arg) => ({
        posts: response,
        page: arg.page,
        limit: arg.limit,
      }),
    }),
  }),
});
And here’s how you can use this paginated query in a component, along with buttons to navigate between pages:
const Workspaces = () => {
  const [page, setPage] = useState(1);
  const { data, error, isLoading } = apiSlice.useGetWorkspacesQuery({ page, limit: 10 });

  if (isLoading) return <div>Loading...</div>;
  if (error) return <div>Error occurred</div>;

  return (
    <div>
      {data.posts.map(post => <WorkspaceRecord key={post.id} {...post} />)}
      <button onClick={() => setPage(prev => prev - 1)}>Previous</button>
      <button onClick={() => setPage(prev => prev + 1)}>Next</button>
    </div>
  );
};
This component displays a list of posts with pagination controls, allowing users to navigate through pages of data efficiently. The paginated query fetches data in chunks based on the provided page number and page size, improving load times and reducing the initial payload size.
Case Study: Creating and Displaying Workspaces in Yolmo App
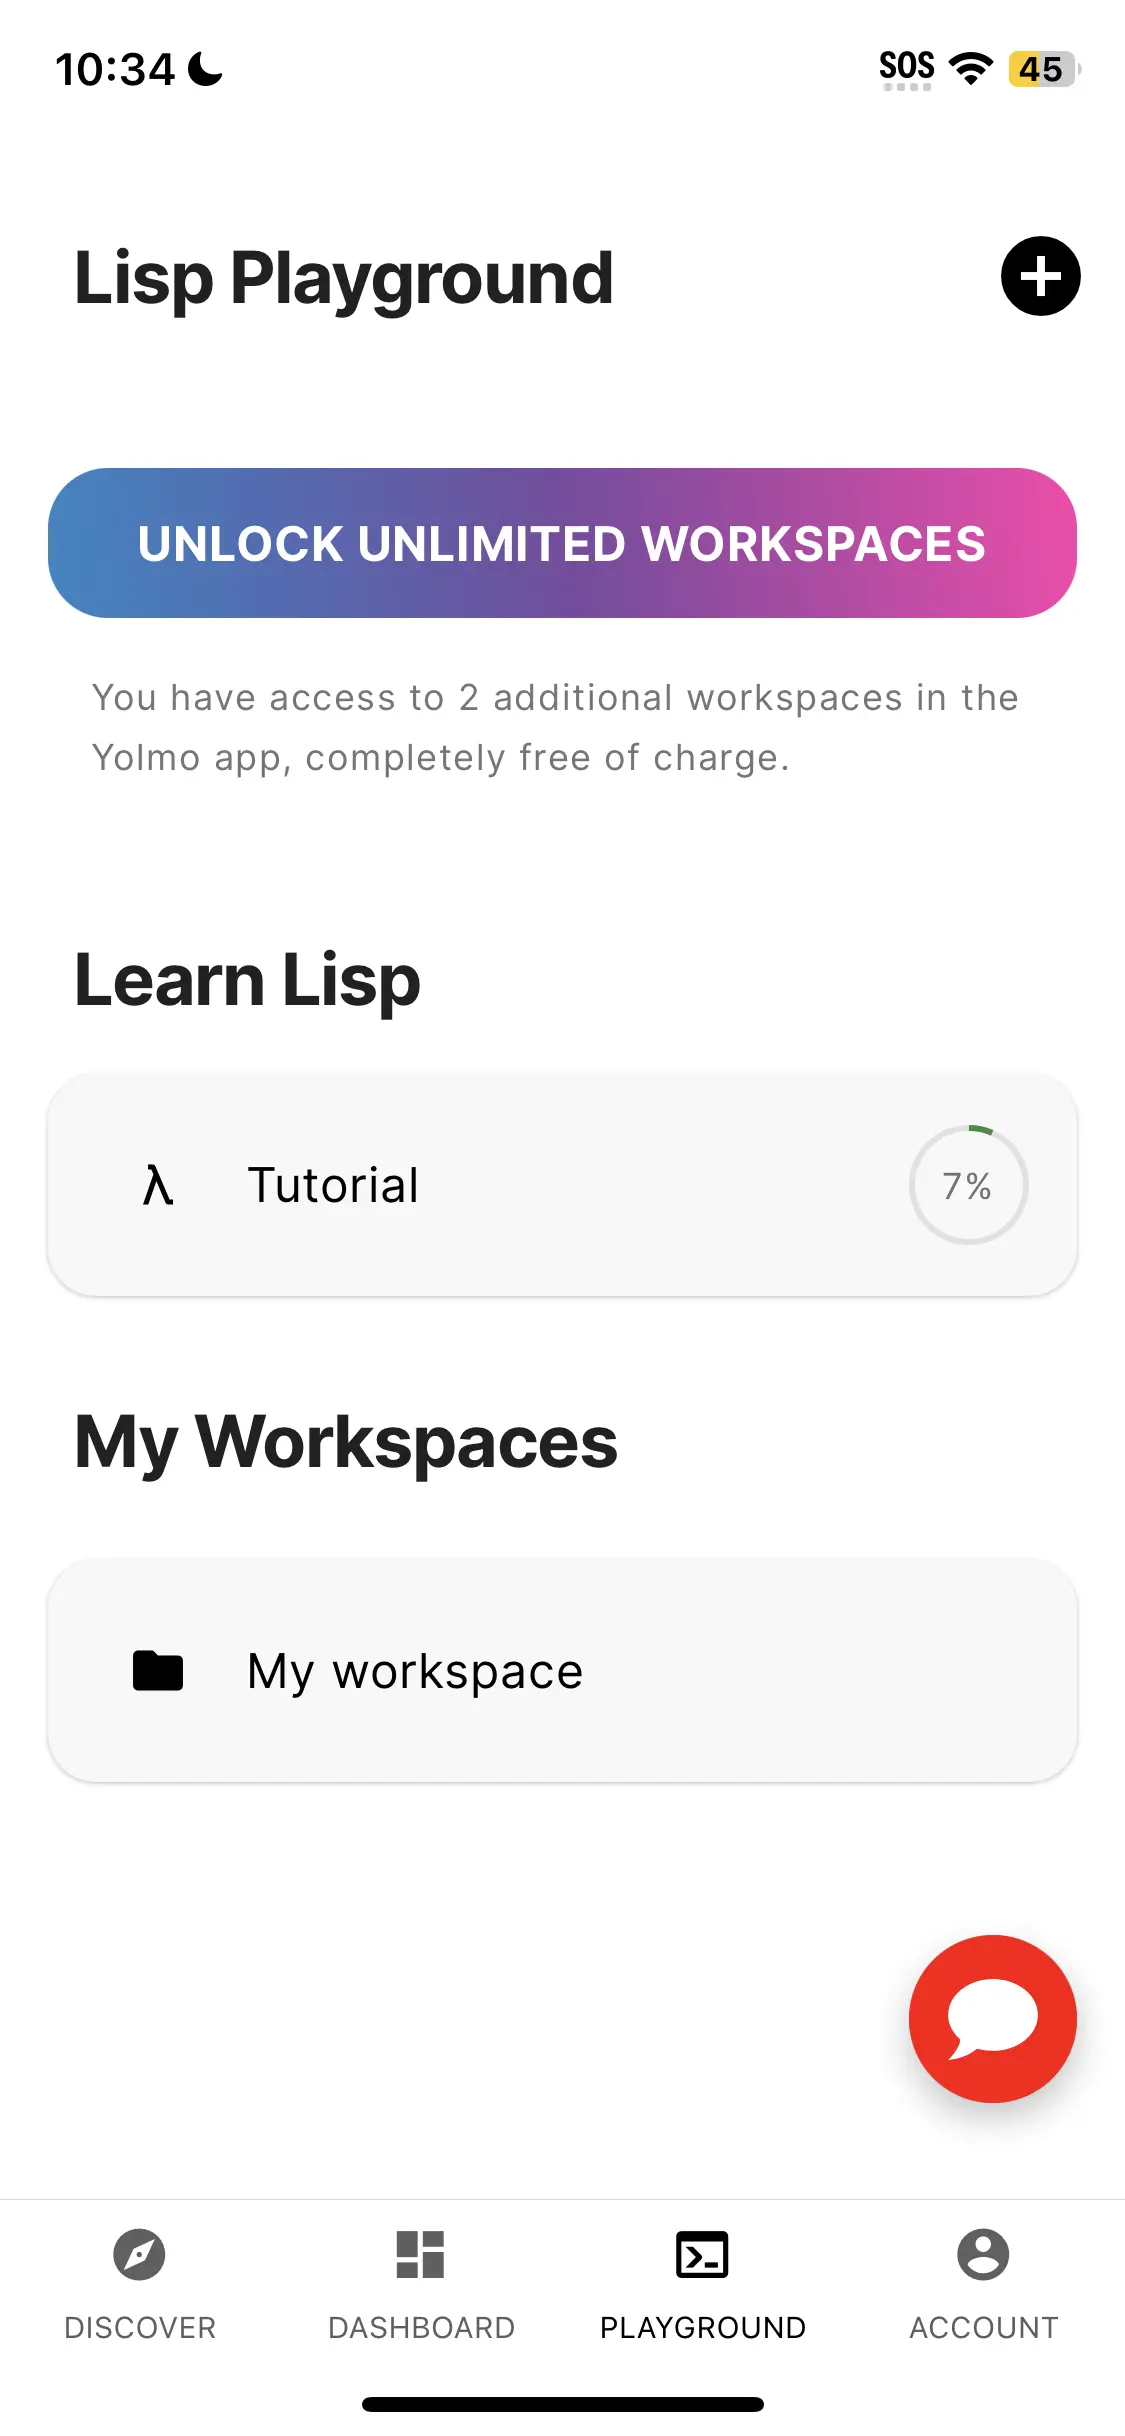
This practical example showcases RTK Query in action within a real-life context - the creation and display of workspaces in the Yolmo app. It emphasizes the utility of RTK Query’s tag invalidation feature, which is used for smooth UI updates after a new workspace is generated.
Overview of the case study
The process involves several key steps:
- Initial State: The application starts with an empty list of workspaces.
- Navigation to Creation Screen: The user navigates to the “Start a workspace” screen using a Plus button.
- Workspace Creation: Upon filling out the necessary details, a workspace is created through a mutation request.
- Utilizing RTK Query Tag Invalidation: Tag invalidation is used to mark cached workspace data as outdated, prompting a fresh fetch of the updated list.
- Displaying the Updated List: The user is then redirected back to the list screen, where the newly created workspace is displayed alongside any existing ones.
Implementing with RTK Query
To achieve this functionality, RTK Query’s createApi is used to define endpoints for fetching and creating workspaces, utilizing tags to manage cache invalidation efficiently:
import { createApi, fetchBaseQuery } from '@reduxjs/toolkit/query/react';

export const workspaceApi = createApi({
  reducerPath: 'workspaceApi',
  baseQuery: fetchBaseQuery({ baseUrl: '/api' }),
  tagTypes: ['Workspace'],
  endpoints: (builder) => ({
    getWorkspaces: builder.query({
      query: () => 'workspaces',
      providesTags: (result = [], error, arg) =>
        result ?
          [...result.map(({ id }) => ({ type: 'Workspace', id })), 'Workspace'] :
          ['Workspace'],
    }),
    createWorkspace: builder.mutation({
      query: (workspace) => ({
        url: 'workspaces',
        method: 'POST',
        body: workspace,
      }),
      invalidatesTags: ['Workspace'],
    }),
  }),
});
Viewing the Demo
For those who prefer to learn by watching, there’s a demonstration video available. This video walks you through the process of creating a workspace in the Yolmo app. It clearly shows how RTK Query is used in practice to manage data fetching, caching, and updating.
Conclusion
RTK Query, a part of Redux Toolkit, is a practical tool that simplifies handling server-side data in applications. It offers beneficial features such as optimistic updates and pagination, which aid in providing quick feedback and efficient data loading, thus improving user experience. Additionally, RTK Query minimizes unnecessary code and automates caching, making it a very useful tool in the development of contemporary web applications.
comments powered by Disqus